Putting my armour together - with MyLaw4U straps

Discussions about the TIE fighter pilot armor
Post Reply
User avatar
Sheriff
Detachment Officer - Retired
Posts: 2682
Joined: 2010-11-17 03:02:10
Name: Jason Wood
Garrison: Knightfall Garrison
Location: Melbourne, Australia
Contact:

Costume Level Award

Ace of Aces

Putting my armour together - with MyLaw4U straps

Post by Sheriff »

OK, this has taken quite some time to actually post up, but here it is ..

Image
Untitled by SheriffWoody, on Flickr

This one shows the front armour. Straps are fixed with pot rivets (nylon strapping) & Chicago Screws (octagons, rubber straps & nylon). The front positions were done by eye. Saw what looked good. Made a mark at the bottom of the octagon. Then placed the octagon down without the rubber strap and marked the hole. Oh, I'd already found the centre of the octagon and drilled a hole there. I then drilled a hole big enough for the Chicago screw into the armour.

Image
Untitled by SheriffWoody, on Flickr

This shows how it was layered. I probably don't need the nylon strapping, but it didn't take much to add, so why not.

Image
Untitled by SheriffWoody, on Flickr

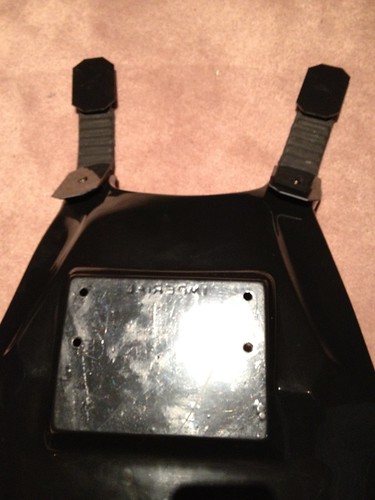
This is the under side. The Chicago screws I got were fairly long so the saddle shop also gave me some leather cut-outs to pad. You can also make out the pot rivet just above the leather disk. Turns out, I didn't really need the pot rivet anyway. I couldn't get the rivet to stick in the other side, so I didn't bother using it.
This pic also illustrates how thick the original rubber straps are. The new batch is apparently much thinner.

Image
Untitled by SheriffWoody, on Flickr

For the back, I went with a double velcro method. Hook Velcro is sewn into the nylon strapping. That connects to loop Velcro on the inside of the back armour. Hook Velcro is also stuck onto the underside of the rubber straps. That connects to loop Velcro stuck to the outside of the back armour. Having the Velcro at the back isn't as obvious as on the front, and it allows the armour to be easily removed and stored.

Image
Untitled by SheriffWoody, on Flickr

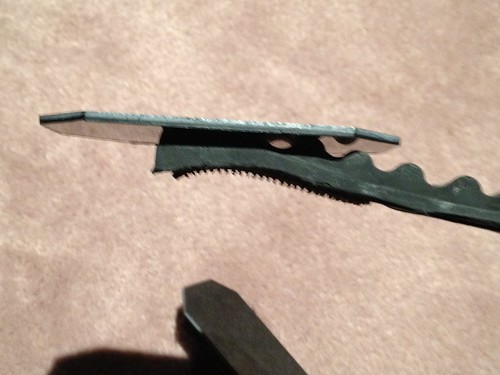
This shows how the octagon was glued to the rubber. Turned out that basic super glue does the trick. You can also see the hook Velcro stuck to the underside of the strap.

Image
Untitled by SheriffWoody, on Flickr

Velcro on the outside of the back. This is where the rubber strap connects.

Image
Untitled by SheriffWoody, on Flickr

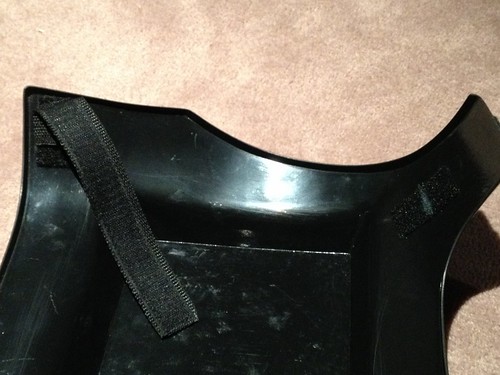
This shows the inside of the back armour. At the top of the armour is the loop Velcro for the nylon strapping. The white line is a guide I use for the end of strap.

You can also see one of the side straps. I've basically got two straps (one for each side) with hook Velcro sewn down the length. On the inside of the front and back armour I have loop Velcro patches stuck down. I just attach those as feels comfortable.

Wow, took a while to get the pics up and a reasonably epic post. It's a pretty basic process really, but I thought it might help someone.
Image
Blackwatch
Ace of Aces
Ace of Aces
Posts: 7002
Joined: 2008-01-04 20:04:18
Name: David D Campbell
Garrison: Bast Alpha Garrison
Location: Watson LA --Bast Alpha Garrison
Has thanked: 2 times
Contact:
United States of America

Costume Level Award

Ace of Aces

Re: Putting my armour together - with MyLaw4U straps

Post by Blackwatch »

Good illustrations, thanks for taking the time to post it!

Velker Actual


Regimental Sergeant Major, 6th Regiment, Tannerman Rifles, Royal Manticoran Marine Corps
Commander, Deep South Mothership, Visitor Fleet
Aliens Legacy Colonial Marine ID A09/TQ0.0.52128E1


Image
Image

Rule the sky, Rule the night
xanthis02
Omega Squadron
Posts: 175
Joined: 2012-10-03 20:52:44
Name: Greg Srbren
Garrison: Star Garrison
Location: Crosby TX
Contact:

Re: Putting my armour together - with MyLaw4U straps

Post by xanthis02 »

what size drill bit did you use thinking of chicago screws on front and back of the armor i think i'm just going to do just the rubber straps and did you drill the holes at the very end of the rectangles on the straps
I don't deal in maybes I only deal in absolutes ( kills that is )
User avatar
Sheriff
Detachment Officer - Retired
Posts: 2682
Joined: 2010-11-17 03:02:10
Name: Jason Wood
Garrison: Knightfall Garrison
Location: Melbourne, Australia
Contact:

Costume Level Award

Ace of Aces

Re: Putting my armour together - with MyLaw4U straps

Post by Sheriff »

I can't remember the drill bit size. I just grabbed the Chicago screw and eyeballed it. :)

As for where did I drill in the straps .. roughly middle of the rectangle. You can sort of see that in the upside down pic.
On the back, I didn't actually use Chicago screws, I just glued it down. You don't really see the back.
Oh, and also, I just used a black sharpie on to colour in the top of the Chicago screws. They were a plain silver colour before.
Image
User avatar
Black knight
501st
501st
Posts: 208
Joined: 2012-05-26 01:42:45
Name: Michael Jack
Garrison: Southern Cross Garrison
Location: Sydney. NSW Australia
Contact:

Re: Putting my armour together - with MyLaw4U straps

Post by Black knight »

Now this is a good way of connecting armour, since my plastic shoulder straps broke & I got the rubber ones from mylaw4u, the octagonal discs spin, I could grind my Chicago screws down to make it tighter, but this idea is much better. Thanks

:TI :inter
Taking out the Rebels, 22 KILLS DOWN
User avatar
R6Chavez
Ace of Aces
Ace of Aces
Posts: 687
Joined: 2013-01-01 16:56:29
Name: Harrison Fox
Garrison: Starkiller Garrison
Location: East Brady, PA
Contact:

Costume Level Award

Ace of Aces

Re: Putting my armour together - with MyLaw4U straps

Post by R6Chavez »

Nice :)
TI/IG/IC-12226
Starkiller Garrison
:TI2 :inter :bomber :bomber :inter :TI2
Post Reply