T/A Armor - Your Opinions?
-
DarthMel
- Member - Black Widow

- Posts: 108
- Joined: 2013-03-25 17:22:21
- Name: Melissa Place
- Garrison: Ohio Garrison
- Contact:
-
Costume Level Award
T/A Armor - Your Opinions?
I'm trying to get ahold of armor, box, and helmet and was looking at A/T. What has been your experience? Is it a kit that a noob can put together? I saw a build thread where someone had to use a heat gun on the helmet, but I've never used, nor do I own one. Also, would I need to buy anything to put this together besides cogs for the helmet and paint for the resin bits?
DarthMel
DZ/IC/TI/IG/TK/TR-42042
DZ/IC/TI/IG/TK/TR-42042
-
Blackwatch
- Ace of Aces

- Posts: 7002
- Joined: 2008-01-04 20:04:18
- Name: David D Campbell
- Garrison: Bast Alpha Garrison
- Location: Watson LA --Bast Alpha Garrison
- Has thanked: 2 times
- Contact:

-
Costume Level Award
Ace of Aces
Re: T/A Armor - Your Opinions?
its old DL molds and the vacuum is not nearly as crisp.
Some have reported issues with the fit of the box.
As with many of these helmets one side is higher than the other. here is how I just made a bunch of X wing helmets from DarthHair, I used aviation clecos because they made the helmet inner strip VERY rigid with no slipping, espeically as I was heating the sides with a heat sealing iron. You can find cheap clecos on Amazon, you will need the special pliers to open them. Use 1/8" clecos. Mabye Ebay has an old mechanic's set he's getting rid of cheap.
after I heated and mashed one side down, I stuck the other half in place, drilled my holes, glued and cleco'd the helmet together. Twenty minutes later, with the pressure from the cleco's and the heat from the iron, the glue was totally set.
After taking off all the clecos I used my Mouse sander to make the top strip nice and even, then installed my cap strip.
My first X wing helmet took 3 hours and is wonky. The last one took 52 minutes and is straight-edge straight, due to the clecos pulling everyting into aligment, and using the sealing iron to mash down the higher ridge.
if your helmet does not come with an inner strip , you can use the plastic that comes from a heavy sign, cut that down, and use it as your inner mount strip. Curl both parts up into a circle, tape in place and leave overnight. That will make the strips FAR easier to work with. I figured out the part about the inner strip widening a bunch of DarthMickey X wing helmets. I added 3/4" to each helmet width and made new cap strips for the top of each using the sign plastic.
http://www.amazon.com/s/ref=nb_sb_noss_ ... ords=cleco
I build a lot of helmets and this is a MAJOR time and frustration saver.
Traditional method of installing the inner strip .
using Clecos to align the strip and sealing with iron prior to sanding with sander.
Velker Actual
Regimental Sergeant Major, 6th Regiment, Tannerman Rifles, Royal Manticoran Marine Corps
Commander, Deep South Mothership, Visitor Fleet
Aliens Legacy Colonial Marine ID A09/TQ0.0.52128E1


Rule the sky, Rule the night
-
Tank

- JRS Pilot

- Posts: 193
- Joined: 2012-02-23 02:46:24
- Name: Isaac Irvine
- Garrison: Dune Sea Garrison
- Location: Gilbert Arizona
- Contact:
-
Costume Level Award
Re: T/A Armor - Your Opinions?
I used a T/A for my armor so I can only comment on the armor not the helmet.
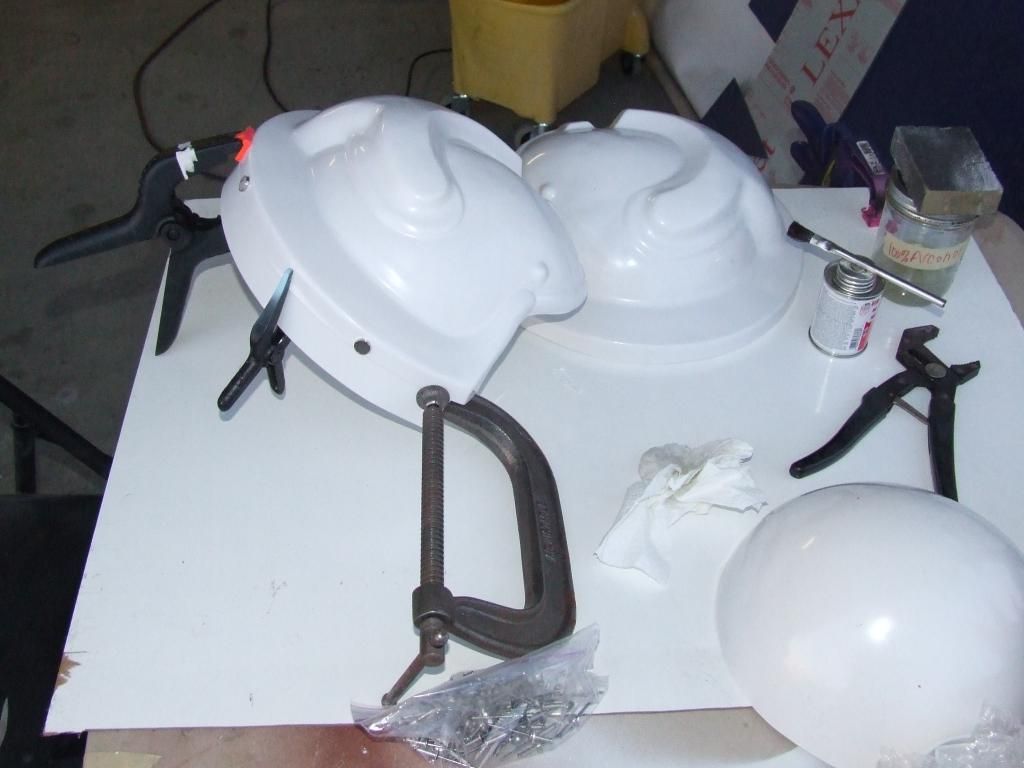
The box and armor was rough trimmed already. I used a tip from Blackwatch on how to get the box to look seamless. Trim the box halves as even as you can and then tape some sandpaper on a plate of glass or other perfectly even surface and wet sand the box halves by running them in figure 8 motions... Then rotate the box in your hand every 4-5 cycles of the figure 8 until perfectly even. Do this on both halves and you will get an even box.
It was an easy build from there. The armor and box included resin greeblies for the box. I am happy with the kit. T/A was cool to work with and the turnaround was really quick from order to shipping it to me. I would definitely order from him again in a heartbeat.
You will need to build a wedge for the top of the box though. There is enough ABS in the kit to build one. I would suggest getting a cast one like Targ has here: http://www.jrs501st.com/viewtopic.php?f=6&t=8651#p73674
Would have saved me time and look better too.
Hope that helps answer your question.
TheIsaac - Phoenix Arizona TK/TI 9492
-
Ramblin' Trooper
- 501st

- Posts: 44
- Joined: 2010-06-28 14:09:30
- Name: Brent Borron
- Garrison: Georgia Garrison
- Location: Atlanta, GA
- Contact:
Re: T/A Armor - Your Opinions?
I built my TA kit a couple of years ago, and I'm sort of helping a friend build one now. Like any kit, it has its pros and cons:
Pros:
Its a great kit for the money. Its one of the more economical ways to build a TIE Pilot.
Quick turnaround. I sent my payment and had a box of armor a week later. I certainly can't speak for Tambo, but you shouldn't have a long wait period for armor. Not the 6 or 8 (or 12... ) month wait time that you'll see with some of the other armor makers.
Its tough. The TA kit is made of really thick ABS plastic (quite a bit thicker than the stuff my TK is made of), and its very durable. It doesn't bend or crack, and it can take a lot of punishment. This plastic doesn't polish up quite as shiny as some other kits... but that may just be me not giving it enough buffing, etc.
Cons:
The details aren't as sharp as you'll see on other kits. As some have said, the molds are old Dan Laws molds, and some of the crispness that you'll find in other kits is somewhat lacking on the TA kits. (Personally, I didn't think that was a big deal, especially for the price I paid. But for some I know that make a big difference. Personal preference I suppose...)
The kit doesn't come with a few small details, so you'll have to be a little creative. Mine came with a small sheet of un-molded ABS plastic that I made the mowhawk strip out of. I also had to cut my own shoulder strap octagons. The chest box doesn't have the little triangular bit on top. It also doesn't have a pill box on the back of the helmet. I made all of these out of the sheet that came with the kit. So you have the material you need, but you better be able to make them yourself.
Most importantly, the helmet is very difficult to assemble. I've built two TKs, a Mando, an X-wing Pilot, and a few other costumes and props, and this helmet is by far the most difficult thing I've ever built. It could be very possible that there's an easier way to assemble them than how I went about it, but I had a tough time of it. The chest box wasn't all that easy either, but it wasn't half as tough as the helmet.
All in all, the TA kit is great if you're on a budget or don't want to wait for months and months, but only if you can put in the skill and hours that it will require to assemble. I would (and have) recommended it to others, but I would hesitate to say its a good kit for a novice/first-time costumer. The way I see it, its all about how much work you're willing to put into it vs. how much money you want to spend.
Hope some of that helps!
Pros:
Its a great kit for the money. Its one of the more economical ways to build a TIE Pilot.
Quick turnaround. I sent my payment and had a box of armor a week later. I certainly can't speak for Tambo, but you shouldn't have a long wait period for armor. Not the 6 or 8 (or 12...
Its tough. The TA kit is made of really thick ABS plastic (quite a bit thicker than the stuff my TK is made of), and its very durable. It doesn't bend or crack, and it can take a lot of punishment. This plastic doesn't polish up quite as shiny as some other kits... but that may just be me not giving it enough buffing, etc.
Cons:
The details aren't as sharp as you'll see on other kits. As some have said, the molds are old Dan Laws molds, and some of the crispness that you'll find in other kits is somewhat lacking on the TA kits. (Personally, I didn't think that was a big deal, especially for the price I paid. But for some I know that make a big difference. Personal preference I suppose...)
The kit doesn't come with a few small details, so you'll have to be a little creative. Mine came with a small sheet of un-molded ABS plastic that I made the mowhawk strip out of. I also had to cut my own shoulder strap octagons. The chest box doesn't have the little triangular bit on top. It also doesn't have a pill box on the back of the helmet. I made all of these out of the sheet that came with the kit. So you have the material you need, but you better be able to make them yourself.
Most importantly, the helmet is very difficult to assemble. I've built two TKs, a Mando, an X-wing Pilot, and a few other costumes and props, and this helmet is by far the most difficult thing I've ever built. It could be very possible that there's an easier way to assemble them than how I went about it, but I had a tough time of it. The chest box wasn't all that easy either, but it wasn't half as tough as the helmet.
All in all, the TA kit is great if you're on a budget or don't want to wait for months and months, but only if you can put in the skill and hours that it will require to assemble. I would (and have) recommended it to others, but I would hesitate to say its a good kit for a novice/first-time costumer. The way I see it, its all about how much work you're willing to put into it vs. how much money you want to spend.
Hope some of that helps!

-
Ramblin' Trooper
- 501st
- Posts: 44
- Joined: 2010-06-28 14:09:30
- Name: Brent Borron
- Garrison: Georgia Garrison
- Location: Atlanta, GA
- Contact:
Re: T/A Armor - Your Opinions?
Blackwatch wrote:its old DL molds and the vacuum is not nearly as crisp.
Some have reported issues with the fit of the box.
As with many of these helmets one side is higher than the other. here is how I just made a bunch of X wing helmets from DarthHair, I used aviation clecos because they made the helmet inner strip VERY rigid with no slipping, espeically as I was heating the sides with a heat sealing iron. You can find cheap clecos on Amazon, you will need the special pliers to open them. Use 1/8" clecos. Mabye Ebay has an old mechanic's set he's getting rid of cheap.
after I heated and mashed one side down, I stuck the other half in place, drilled my holes, glued and cleco'd the helmet together. Twenty minutes later, with the pressure from the cleco's and the heat from the iron, the glue was totally set.
After taking off all the clecos I used my Mouse sander to make the top strip nice and even, then installed my cap strip.
My first X wing helmet took 3 hours and is wonky. The last one took 52 minutes and is straight-edge straight, due to the clecos pulling everyting into aligment, and using the sealing iron to mash down the higher ridge.
if your helmet does not come with an inner strip , you can use the plastic that comes from a heavy sign, cut that down, and use it as your inner mount strip. Curl both parts up into a circle, tape in place and leave overnight. That will make the strips FAR easier to work with. I figured out the part about the inner strip widening a bunch of DarthMickey X wing helmets. I added 3/4" to each helmet width and made new cap strips for the top of each using the sign plastic.
http://www.amazon.com/s/ref=nb_sb_noss_" onclick="window.open(this.href);return false; ... ords=cleco
I build a lot of helmets and this is a MAJOR time and frustration saver.
Traditional method of installing the inner strip .
using Clecos to align the strip and sealing with iron prior to sanding with sander.
This is a very interesting method that I may have to try sometime. I've never heard of clecos before, but I really like the idea of having a strip of plastic *inside* the mowhawk that you can hold together with clecos (or maybe even small pop-rivets for that matter... since they're readily available at hardware stores... and will be covered up anyway), and glue that in place before adding the outside mowhawk strip.
I'm thinking this would have made my build WAY easier. Thanks for sharing.
-
Blackwatch
- Ace of Aces
- Posts: 7002
- Joined: 2008-01-04 20:04:18
- Name: David D Campbell
- Garrison: Bast Alpha Garrison
- Location: Watson LA --Bast Alpha Garrison
- Has thanked: 2 times
- Contact:
-
Costume Level Award
Ace of Aces
Re: T/A Armor - Your Opinions?
clecos are aviation sheetmetal tools. I had two helmets cleco'd together in the kitchen tonight!
it pulls the helmet plastic together tightly and the glue really sets stronger and faster
it pulls the helmet plastic together tightly and the glue really sets stronger and faster
Velker Actual
Regimental Sergeant Major, 6th Regiment, Tannerman Rifles, Royal Manticoran Marine Corps
Commander, Deep South Mothership, Visitor Fleet
Aliens Legacy Colonial Marine ID A09/TQ0.0.52128E1
Rule the sky, Rule the night
-
HoseNose

- Forum Supporter 2019

- Posts: 1194
- Joined: 2012-01-22 14:26:13
- Name: Steve Lewis
- Garrison: Canada: Outer Rim Garrison
- Location: Victoria, BC, Canada
- Contact:

-
Costume Level Award
Ace of Aces
Re: T/A Armor - Your Opinions?
I just finished putting together my T/A helmet, and I'm about half-way through the armour and chest box. This was my first ever armour build, and I would have to say, the helmet was quite challenging to put together, but don't let that discourage you. If I'm able to put a bucket together, then I'm sure anybody can . If you want to see how I put my helmet together, the build thread is here.
As for the kit, I'm not overly impressed. As the others have mentioned it is quite affordable, and the turn around time from when the order was placed to when it was received was quite short in comparison to other kits out there. BUT the pull and details are extremely soft, and in my opinion, the lack of crispness takes away from the overall look of the helmet. My other main issue with the kit is the lack of any real instructions are explanations about how to put everything together. You'll get a CD with images showing different stages of assembling the helmet, but they're not in any clear order that makes any sense and there is no text explaining what's going on. It's kind of like putting together something from IKEA, but the little illustrations are all mixed up.
There's also the fact that the octagon plates, an accurate pill-box, and the wedge for the top of the chest-box are not included with the kit, nor any rubber trim for finishing off the helmet. The cast greeblies aren't the greatest, but I never really had any intention of using those, and ordered anupgraded set from E/T.
For the price, and the wait time, it's an okay kit and I hope this didn't come across as too negative. Hope this helps!
-
Blackwatch
- Ace of Aces
- Posts: 7002
- Joined: 2008-01-04 20:04:18
- Name: David D Campbell
- Garrison: Bast Alpha Garrison
- Location: Watson LA --Bast Alpha Garrison
- Has thanked: 2 times
- Contact:
-
Costume Level Award
Ace of Aces
Re: T/A Armor - Your Opinions?
when i got my gunner kit he sent the three vacuum pulls and a big slab of plastic to make the lip out of.
did you get a big slab of plastic to make the box, wedge and octagons out of?
did you get a big slab of plastic to make the box, wedge and octagons out of?
Velker Actual
Regimental Sergeant Major, 6th Regiment, Tannerman Rifles, Royal Manticoran Marine Corps
Commander, Deep South Mothership, Visitor Fleet
Aliens Legacy Colonial Marine ID A09/TQ0.0.52128E1
Rule the sky, Rule the night
-
HoseNose
- Forum Supporter 2019
- Posts: 1194
- Joined: 2012-01-22 14:26:13
- Name: Steve Lewis
- Garrison: Canada: Outer Rim Garrison
- Location: Victoria, BC, Canada
- Contact:
-
Costume Level Award
Ace of Aces
Re: T/A Armor - Your Opinions?
Yup, I sure did. However, I used most of it when I remade the trident piece. My "issue" (and it's not even a big one so please don't think I'm being a hater) is that if a person has ordered a kit-of-parts, then that's what they should get, the parts, not the raw materials to make the parts from.Blackwatch wrote:...did you get a big slab of plastic to make the box, wedge and octagons out of?
-
Blackwatch
- Ace of Aces
- Posts: 7002
- Joined: 2008-01-04 20:04:18
- Name: David D Campbell
- Garrison: Bast Alpha Garrison
- Location: Watson LA --Bast Alpha Garrison
- Has thanked: 2 times
- Contact:
-
Costume Level Award
Ace of Aces
Re: T/A Armor - Your Opinions?
yah i hear ya on that. I think people in this hobby expect a bit more than the old style model builders "bag of balsa and plans" .
Velker Actual
Regimental Sergeant Major, 6th Regiment, Tannerman Rifles, Royal Manticoran Marine Corps
Commander, Deep South Mothership, Visitor Fleet
Aliens Legacy Colonial Marine ID A09/TQ0.0.52128E1
Rule the sky, Rule the night
-
spacebrew
- JRS Pilot
- Posts: 207
- Joined: 2012-03-03 01:12:59
- Name: chad brewer
- Garrison: California: Southern California Garrison
- Location: Ventura,Ca
- Contact:
-
Costume Level Award
Ace of Aces
Re: T/A Armor - Your Opinions?
As a self proclaimed Macgyver of sorts I welcomed the challenge of building this kit. The extra slab of plastic was a welcomed gift for reinforcing purposes and being able to fab my own octagons to fit my after market Kai rubber straps . I didn't attempt building a wedge and opted for a resin cast one from  The box was a easy build with sanding suggestions and the rtv gasket silicone recommendation from Blackwatch .
Now the helmet is by far one of the more difficult things I've ever built. Looking at the raw parts and the lack of defined lines for trimming it can be intimidating. My suggestion is use the trident width measurement for the mohawk width and go for it. Using a jig similar to the one in Ramblin' Trooper build thread
viewtopic.php?f=4&t=4619
It started make sence and went smoothly, just remember to use tape on the seams and use glue sparely.
You can always add more glue inside and reinforce once its together. You don't want to have a blowout of glue on the outside of the bucket. ABS glue or any plastic bonding agent works by melting at the molecular level and once exposed to the shinny side it will never look pristine no matter how fast you wipe it off.
The face plate does have some soft features ,but if you cut out the teeth it is next to unnoticeable . Only the beard really lacks definition, and with some creative painting you can achieve a more detailed look.
Price point and turn around time makes this kit desirable but its not for the faint of heart.
T\A is some times hard to get a hold of due to his occupation. but when he's in production mode he's a great guy to do business with.


-
Clonezilla
- 501st
- Posts: 10
- Joined: 2010-12-04 10:10:58
- Name: Luke Hedrick
- Garrison: Midsouth Garrison
- Location: East Tennessee
- Contact:
Re: T/A Armor - Your Opinions?
Tambo is working on a few upgrades to his kit. I will let him speak of all of those himself when he's ready, but I can say when I got my kit from him that it now contains a resin wedge for the chest box. It was a pleasant surprise after reading that I would need to make or buy one.